
Dual WAN Failover for Your Homelab: Automatic Internet Redundancy
Your ISP will go down. Maybe it's maintenance at 2 AM, maybe it's a backhoe hitting a cable, maybe it's just your ISP being terrible. If you're running services that need to stay online — a VPN endpoint, a monitoring dashboard, a Nextcloud instance your family depends on — a single internet connection is a single point of failure.
Photo by Mike Hindle on Unsplash
Dual WAN failover gives you a second internet connection that kicks in automatically when the primary goes down. No manual intervention, no reconfiguring routes, no downtime beyond a few seconds of detection delay. For homelabs that serve as production infrastructure for families or small businesses, this is one of the highest-value reliability upgrades you can make.
Do You Actually Need This?
Before spending money on a second ISP, be honest about your requirements:
You probably need dual WAN if:
- You work from home and your income depends on internet uptime
- Family members rely on self-hosted services (Nextcloud, Home Assistant) and will complain loudly when things break
- You're running services accessed by people outside your household
- Your primary ISP has reliability problems (check your uptime logs)
- You're running a monitoring system that needs to send alerts even when your main line is down
You probably don't need it if:
- Your homelab is purely a learning environment
- Downtime is an inconvenience, not a problem
- Your ISP has been rock-solid for years
The cost isn't trivial. A second ISP connection is $30-80/month depending on your area. But if you're already paying for a mobile data plan, you can repurpose it as a failover WAN for minimal extra cost.
Choosing Your Secondary WAN
Option 1: Second Wired ISP
The gold standard. A completely independent connection — different ISP, different last-mile technology if possible (cable + fiber, or cable + DSL). This gives you maximum independence: the two connections are unlikely to fail simultaneously.
Pros: Full speed, low latency, high reliability Cons: Most expensive, may not be available in your area, installation lead time
Option 2: Cellular (4G/5G) Backup
A USB cellular modem or a dedicated LTE/5G router as your secondary WAN. This is the most popular choice for homelab failover because it's cheap and works everywhere.
Pros: Available almost anywhere, $20-40/month for a data plan, quick to set up Cons: Higher latency, data caps, speed varies by location and congestion
Popular hardware:
- Netgear LB1120/LB2120: Dedicated LTE modem with Ethernet out — plug and play
- GL.iNet Mudi V2: Portable 4G/5G router, Ethernet output
- USB modem + Raspberry Pi: Budget option, but more fiddly
Option 3: Starlink
Starlink as a backup WAN works well. It's independent of ground infrastructure (cable, fiber, DSL), so it fails for completely different reasons than your primary ISP.
Pros: Independent failure mode, decent speeds, available in rural areas Cons: $120/month, latency varies, weather-sensitive
Option 4: Neighbor's Connection (With Permission)
If you have a friendly neighbor with a different ISP, you can run an Ethernet cable or set up a point-to-point wireless link between your houses. Share the cost.
Pros: Very cheap, truly independent path Cons: Requires social engineering, possible property complications, depends on relationship
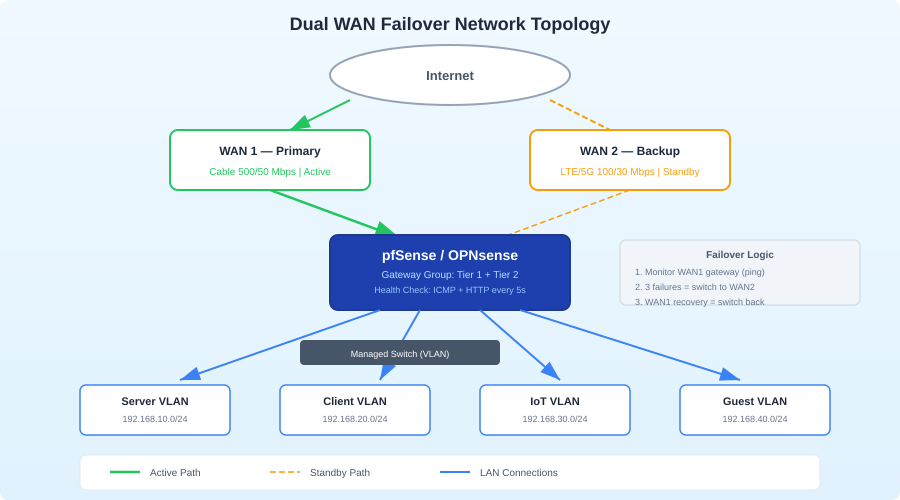
Architecture: How Dual WAN Works
The basic setup is straightforward:
              ┌─────────────────┐
Internet A ──▶│                 │
              │  Router/Firewall │──▶ LAN (your homelab)
Internet B ──▶│  (dual WAN)     │
              └─────────────────┘
Your router has two WAN interfaces. It monitors both connections and routes traffic based on rules:
Active-Passive (Failover): All traffic goes through WAN1. If WAN1 fails health checks, traffic switches to WAN2. When WAN1 recovers, traffic switches back.
Active-Active (Load Balancing): Traffic is distributed across both WANs. If one fails, the other takes all traffic. You get more bandwidth during normal operation but more complexity.
Policy-Based Routing: Specific traffic goes through specific WANs. For example, VPN always uses WAN1, video streaming uses WAN2. Combined with failover.
For most homelabs, active-passive failover is the right choice. It's simpler, more predictable, and you're not paying for a second connection to use it daily — you're paying for reliability.
Want more networking guides? Get guides like this in your inbox — HomeLab Starter delivers one free deep-dive every week.
Setup: pfSense / OPNsense
Both pfSense and OPNsense have excellent multi-WAN support built in. If you're already running either as your homelab firewall, this is the easiest path.
Physical Setup
- Connect WAN1 (primary ISP) to your firewall's first WAN port
- Connect WAN2 (secondary ISP or LTE modem) to a second interface
- Assign the second interface as WAN2 in the firewall UI
pfSense Configuration
Step 1: Assign the WAN2 Interface
Go to Interfaces > Assignments. Assign the second physical port and name it WAN2. Configure it with DHCP (or static, depending on your secondary ISP).
Step 2: Set Up Gateway Monitoring
Go to System > Routing > Gateways. You should see gateways for both WANs. For each gateway, configure monitoring:
Monitor IP: 1.1.1.1 (for WAN1)
Monitor IP: 8.8.8.8 (for WAN2)
Use different monitor IPs for each WAN. These IPs are pinged regularly to determine if the connection is alive. Don't use your ISP's gateway IP — if their gateway is up but their upstream is down, you'll get false positives.
Configure thresholds:
Latency thresholds: Low 200ms, High 500ms
Packet loss thresholds: Low 10%, High 20%
Probe interval: 1 second
Loss interval: 2 seconds
Alert interval: 5 seconds (how quickly failover triggers)
Step 3: Create a Gateway Group
Go to System > Routing > Gateway Groups. Create a new group:
Name: Failover_Group
WAN_GW:   Tier 1 (primary)
WAN2_GW:  Tier 2 (backup)
Trigger Level: Member Down
Tier 1 is preferred. Tier 2 is only used when Tier 1 is down. "Member Down" means failover happens when the gateway is completely unresponsive — you can also set it to trigger on "Packet Loss" or "High Latency" for more aggressive failover.
Step 4: Apply to Firewall Rules
Go to Firewall > Rules > LAN. Edit your default LAN-to-any rule. Under Gateway, select your Failover_Group instead of the default gateway.
That's it. pfSense will now route all LAN traffic through WAN1, and automatically switch to WAN2 if WAN1's health checks fail.
OPNsense Configuration
The process is nearly identical in OPNsense:
- Interfaces > Assignments: Add WAN2
- System > Gateways > Configuration: Set monitor IPs for both gateways
- System > Gateways > Group: Create failover group with priorities
- Firewall > Rules > LAN: Set gateway to the failover group
OPNsense's gateway monitoring UI is slightly different but the concepts are the same.
Setup: Linux Router (Advanced)
If your homelab router is a Linux box, you can build dual WAN failover with ip route, health check scripts, and some patience. This is more work but gives you complete control.
Interface Configuration
Assuming eth0 is WAN1 and eth1 is WAN2:
# /etc/network/interfaces or equivalent for your distro

# WAN1 - Primary
auto eth0
iface eth0 inet dhcp
    metric 100

# WAN2 - Secondary (higher metric = lower priority)
auto eth1
iface eth1 inet dhcp
    metric 200
The metric value determines priority. Lower metric = preferred route. Under normal conditions, all traffic uses eth0 (metric 100).
Routing Tables
Set up separate routing tables for each WAN:
# /etc/iproute2/rt_tables
100 wan1
200 wan2
Configure policy routing:
# Routes for WAN1
ip route add default via 192.168.1.1 dev eth0 table wan1
ip rule add from 192.168.1.0/24 table wan1 priority 100

# Routes for WAN2
ip route add default via 10.0.0.1 dev eth1 table wan2
ip rule add from 10.0.0.0/24 table wan2 priority 200
Health Check Script
Create a script that monitors both WANs and adjusts routing:
#!/bin/bash
# /usr/local/bin/wan-failover.sh

WAN1_GW="192.168.1.1"
WAN2_GW="10.0.0.1"
WAN1_IF="eth0"
WAN2_IF="eth1"
CHECK_IP_WAN1="1.1.1.1"
CHECK_IP_WAN2="8.8.8.8"
PING_COUNT=3
PING_TIMEOUT=2

CURRENT_STATE_FILE="/tmp/wan_state"

check_wan() {
    local iface=$1
    local target=$2
    ping -c $PING_COUNT -W $PING_TIMEOUT -I $iface $target > /dev/null 2>&1
    return $?
}

get_current_state() {
    if [ -f "$CURRENT_STATE_FILE" ]; then
        cat "$CURRENT_STATE_FILE"
    else
        echo "wan1"
    fi
}

set_state() {
    echo "$1" > "$CURRENT_STATE_FILE"
}

WAN1_UP=false
WAN2_UP=false

if check_wan $WAN1_IF $CHECK_IP_WAN1; then
    WAN1_UP=true
fi

if check_wan $WAN2_IF $CHECK_IP_WAN2; then
    WAN2_UP=true
fi

CURRENT=$(get_current_state)

if $WAN1_UP && [ "$CURRENT" != "wan1" ]; then
    echo "$(date): WAN1 recovered, switching back to primary"
    ip route replace default via $WAN1_GW dev $WAN1_IF metric 100
    set_state "wan1"
    logger -t wan-failover "Switched to WAN1 (primary recovered)"
elif ! $WAN1_UP && $WAN2_UP && [ "$CURRENT" != "wan2" ]; then
    echo "$(date): WAN1 down, failing over to WAN2"
    ip route replace default via $WAN2_GW dev $WAN2_IF metric 100
    set_state "wan2"
    logger -t wan-failover "Switched to WAN2 (failover)"
elif ! $WAN1_UP && ! $WAN2_UP; then
    logger -t wan-failover "WARNING: Both WANs are down"
fi
Run it via cron or a systemd timer every 10-30 seconds:
# /etc/systemd/system/wan-failover.timer
[Unit]
Description=WAN failover check

[Timer]
OnBootSec=30
OnUnitActiveSec=15

[Install]
WantedBy=timers.target
# /etc/systemd/system/wan-failover.service
[Unit]
Description=WAN failover health check

[Service]
Type=oneshot
ExecStart=/usr/local/bin/wan-failover.sh
sudo systemctl enable --now wan-failover.timer
Handling DNS During Failover
DNS is often the forgotten piece. If your DNS resolvers are only reachable through WAN1, failover will "work" but nothing will resolve.
Solution 1: Use public DNS on both WANs
Configure your resolver (Pi-hole, Unbound, etc.) to use upstream DNS servers reachable from both WANs:
1.1.1.1 (Cloudflare)
8.8.8.8 (Google)
9.9.9.9 (Quad9)
Solution 2: Run a local recursive resolver
If you run Unbound as a recursive resolver, it queries root servers directly. As long as you have any internet connection, DNS works. This is the most resilient option.
Handling Inbound Connections
Failover is easy for outbound traffic — you just change the default route. Inbound traffic is harder.
If you're running services that people access from the internet (via port forwarding or a VPN endpoint), your public IP changes when you fail over to WAN2. Solutions:
Dynamic DNS
Run DDNS updates for both WANs. When failover happens, update your DDNS record to point to the new public IP:
# Add to your failover script
if [ "$NEW_STATE" = "wan2" ]; then
    # Update DDNS to WAN2's public IP
    curl -s "https://api.duckdns.org/update?domains=myhomelab&token=xxx&ip=$(curl -s -4 --interface eth1 ifconfig.me)"
fi
The TTL on your DDNS record determines how long the cutover takes. Set it low (60-300 seconds).
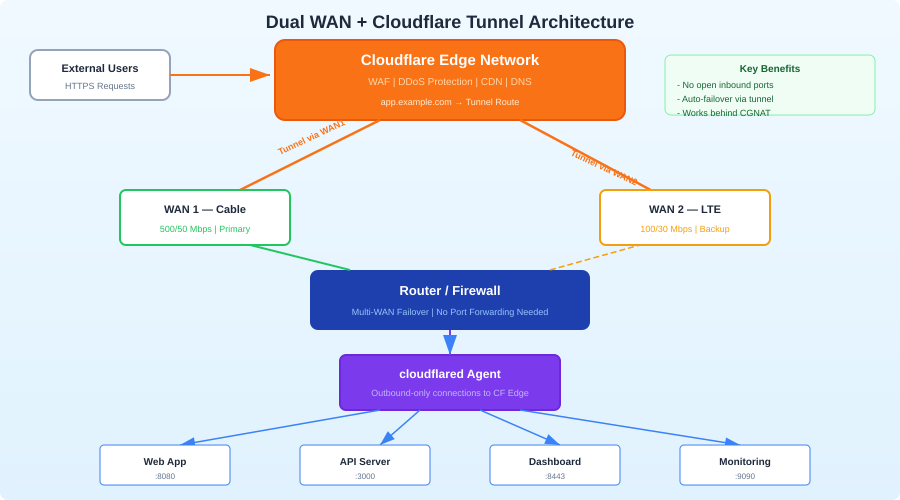
Cloudflare Tunnel
If you're using Cloudflare Tunnel for inbound access, failover is transparent. The tunnel client (cloudflared) establishes an outbound connection to Cloudflare's network. When your WAN fails over, the tunnel reconnects through the new path automatically. No DNS changes, no port forwarding.
This is the simplest solution for inbound failover and another reason to consider Cloudflare Tunnel for homelab ingress.
Testing Your Failover
Don't assume it works. Test it:
- Pull the cable: Physically disconnect WAN1. Verify traffic switches to WAN2 within your expected timeframe.
- Monitor the transition: Run continuous pings from a LAN machine while you pull the cable. Count how many pings are lost.
- Test failback: Reconnect WAN1. Verify traffic returns to the primary within your expected timeframe.
- Test DNS: During failover, verify name resolution works.
- Test inbound: If you have inbound services, verify they're reachable after failover (this may take longer due to DNS propagation).
Expected results for a properly tuned setup:
- Failover detection: 5-15 seconds
- Traffic switchover: 1-2 seconds after detection
- Total outage: 10-20 seconds (mostly detection delay)
- Failback: Similar timing when WAN1 recovers
Monitoring Dual WAN
Set up alerts so you know when failover happens:
# Prometheus alerting rule
groups:
  - name: wan-failover
    rules:
      - alert: WANFailover
        expr: wan_active_interface != 1
        for: 1m
        labels:
          severity: warning
        annotations:
          summary: "WAN failover active - running on secondary connection"
Or simpler, just watch your firewall's gateway status page and set up email/push notifications in pfSense/OPNsense under System > Notifications.
Also monitor:
- WAN2 data usage: If your backup is metered (cellular), track usage to avoid surprise bills
- Failover frequency: If you're failing over often, your primary ISP might have a reliability problem worth addressing
- Failback timing: Make sure you're returning to primary promptly when it recovers
Cost-Benefit Analysis
| Secondary WAN Type | Monthly Cost | Failover Speed | Reliability | Best For |
|---|---|---|---|---|
| Second wired ISP | $40-80 | Near-instant | High | Work-from-home, critical services |
| LTE modem | $20-40 | 10-30s | Medium | General homelab redundancy |
| 5G home internet | $25-50 | 10-30s | Medium-High | Good speeds, moderate cost |
| Starlink | $120 | 10-30s | Medium | Rural areas, independent failure mode |
| Neighbor's ISP | $0-20 | 10-30s | Variable | Budget option |
Wrapping Up
Dual WAN failover is one of those upgrades that feels unnecessary until your ISP goes down at the worst possible moment. The setup isn't complicated — pfSense and OPNsense make it point-and-click, and even a Linux router can do it with a simple health check script.
The real decision is whether the monthly cost of a second connection is worth the uptime guarantee. For most serious homelabbers — especially those with families depending on self-hosted services or remote work requirements — it is.
Start with a cheap LTE modem as WAN2. Test it. If you find yourself relying on it more than you expected, upgrade to a proper second wired connection later.