
MergerFS + SnapRAID: Flexible Union Storage for Your Homelab
ZFS and Btrfs get all the attention in homelab storage discussions. They're great — if your drives are the same size, you buy them all at once, and you're comfortable with their specific management models. But many homelabbers accumulate drives over time. A 4TB from three years ago, an 8TB from last year, a 12TB you got on sale. ZFS makes mixing drive sizes painful. Btrfs RAID5/6 is still not recommended for production use.
Photo by Brecht Corbeel on Unsplash
MergerFS + SnapRAID is the answer for the rest of us. MergerFS pools your drives into a single mountpoint. SnapRAID adds parity protection on top. You can mix any drive sizes, add drives whenever you want, and each drive remains a standalone filesystem — if everything goes wrong, you can plug any individual drive into another machine and read its files directly.
This combination has been the backbone of media server homelabs for years, and for good reason. Let's set it up properly.
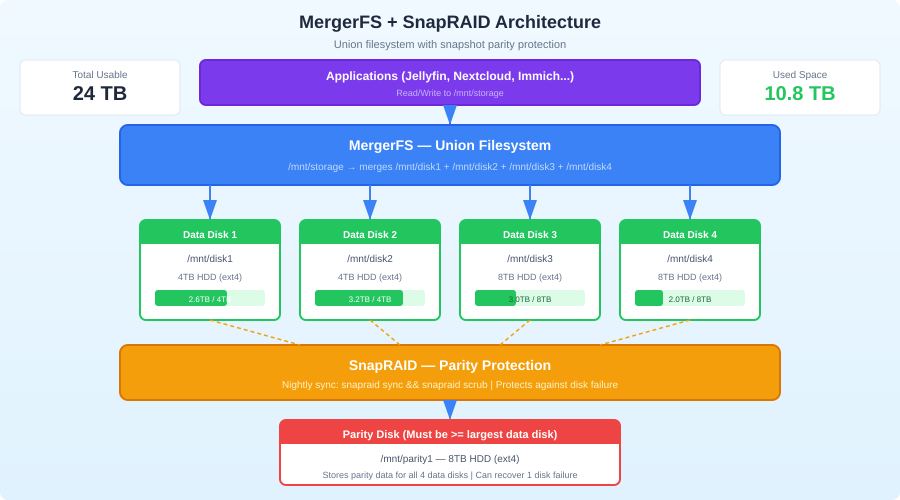
How MergerFS + SnapRAID Work Together
These are two separate tools that complement each other:
MergerFS: Union Filesystem
MergerFS takes multiple individual filesystems (drives) and presents them as a single merged mountpoint using FUSE. It's not RAID — it doesn't stripe or mirror data. Each file lives on exactly one physical drive. MergerFS just decides which drive to put new files on based on policies you configure.
Drive 1 (/mnt/disk1): movies/a-through-m/
Drive 2 (/mnt/disk2): movies/n-through-z/
Drive 3 (/mnt/disk3): tv-shows/

MergerFS mount (/mnt/storage):
  movies/a-through-m/    (from disk1)
  movies/n-through-z/    (from disk2)
  tv-shows/              (from disk3)
Users and applications see a single /mnt/storage with all the files.
SnapRAID: Snapshot Parity
SnapRAID calculates parity data across your drives, like RAID5/6, but on a snapshot basis. You run snapraid sync periodically (daily via cron), and it calculates parity for any files that changed. If a drive fails, you use the parity drive to reconstruct its data.
Key difference from traditional RAID: SnapRAID doesn't protect against data loss between syncs. If you write a file at 3 PM and the drive dies at 4 PM before the nightly sync runs, that file has no parity protection. This makes it ideal for media libraries (write once, read many) and less ideal for databases or constantly-changing data.
Why This Combination?
| Feature | MergerFS + SnapRAID | ZFS RAIDZ | Btrfs RAID |
|---|---|---|---|
| Mix drive sizes | Yes | Possible but wasteful | Possible but risky |
| Add drives anytime | Yes, trivially | Yes, but must add vdevs | Yes |
| Individual drive recovery | Yes | No | No |
| Real-time parity | No (snapshot) | Yes | Yes |
| CPU overhead | Minimal | Medium (checksumming) | Low |
| RAM requirements | Minimal | 1GB per TB recommended | Low |
| Filesystem choice | Anything (ext4, XFS) | ZFS only | Btrfs only |
Prerequisites
You need:
- 2+ data drives of any size and type (HDD recommended for bulk storage)
- 1+ parity drive that is at least as large as your largest data drive
- A Linux system (any distro works)
- ext4 or XFS formatted drives (both work well; ext4 is the most common choice)
For this guide, we'll use:
- 3 data drives: 4TB, 8TB, 12TB
- 1 parity drive: 12TB (must be >= largest data drive)
Step 1: Prepare the Drives
Format each drive individually. Don't use LVM, don't use mdadm. Plain partitions with ext4 or XFS:
# Identify your drives
lsblk -o NAME,SIZE,MODEL

# Partition each drive (example for /dev/sdb)
sudo parted /dev/sdb mklabel gpt
sudo parted /dev/sdb mkpart primary ext4 0% 100%

# Format with ext4
sudo mkfs.ext4 -m 0 -T largefile4 /dev/sdb1
sudo mkfs.ext4 -m 0 -T largefile4 /dev/sdc1
sudo mkfs.ext4 -m 0 -T largefile4 /dev/sdd1
sudo mkfs.ext4 -m 0 -T largefile4 /dev/sde1  # parity drive
The -m 0 flag disables reserved blocks (unnecessary for data drives). -T largefile4 optimizes for large media files.
Create Mount Points
sudo mkdir -p /mnt/disk{1,2,3}
sudo mkdir -p /mnt/parity1
sudo mkdir -p /mnt/storage  # MergerFS mount point
Set Up fstab
Use UUIDs (not device names) so drives mount correctly regardless of detection order:
# Get UUIDs
blkid /dev/sdb1 /dev/sdc1 /dev/sdd1 /dev/sde1
Add to /etc/fstab:
# Data drives
UUID=xxxx-xxxx /mnt/disk1   ext4 defaults 0 2
UUID=yyyy-yyyy /mnt/disk2   ext4 defaults 0 2
UUID=zzzz-zzzz /mnt/disk3   ext4 defaults 0 2

# Parity drive
UUID=pppp-pppp /mnt/parity1 ext4 defaults 0 2
Mount everything:
sudo mount -a
Want more storage guides? Get guides like this in your inbox — HomeLab Starter delivers one free deep-dive every week.
Step 2: Install MergerFS
From Package Manager
# Ubuntu/Debian
sudo apt install mergerfs

# Fedora
sudo dnf install mergerfs

# Arch (AUR)
yay -S mergerfs
From GitHub Releases (Recommended for Latest Version)
MergerFS releases frequently and distro packages can be outdated:
# Download the latest .deb or .rpm from:
# https://github.com/trapexit/mergerfs/releases

# Example for Debian/Ubuntu
wget https://github.com/trapexit/mergerfs/releases/download/2.40.2/mergerfs_2.40.2.debian-bookworm_amd64.deb
sudo dpkg -i mergerfs_2.40.2.debian-bookworm_amd64.deb
Configure MergerFS
Add to /etc/fstab:
/mnt/disk1:/mnt/disk2:/mnt/disk3 /mnt/storage mergerfs defaults,allow_other,use_ino,cache.files=partial,dropcacheonclose=true,category.create=mfs,fsname=mergerfs 0 0
Let's break down the key options:
allow_other: Lets all users access the mount (needed for Samba/NFS)use_ino: Improves inode handling for better compatibilitycache.files=partial: Enables page caching for better read performancedropcacheonclose=true: Frees cache when files are closed (saves RAM)category.create=mfs: The placement policy for new files
File Placement Policies
The category.create option controls which drive new files land on. Common policies:
mfs(most free space): New files go on the drive with the most free space. Good default — naturally balances your drives.lfs(least free space): Fills drives one at a time. Useful if you want to minimize spin-up of multiple drives.epmfs(existing path, most free space): If the parent directory exists on a drive, use that drive. Otherwise, pick the drive with the most free space. Best for keeping related files on the same drive.rand: Random placement. Simple but doesn't balance well.
For media homelabs, epmfs is often the best choice. It keeps TV show seasons together on the same drive, which improves sequential read performance and keeps things tidy.
Mount it:
sudo mount /mnt/storage
Verify:
df -h /mnt/storage
# Should show combined space of all data drives

ls /mnt/storage
# Should show merged view of all drives
Step 3: Install and Configure SnapRAID
Installation
# Ubuntu/Debian
sudo apt install snapraid

# Fedora (may need COPR or build from source)
sudo dnf install snapraid

# From source
git clone https://github.com/amadvance/snapraid.git
cd snapraid
./configure
make
sudo make install
Configuration
Create /etc/snapraid.conf:
# Parity file(s) — one per parity drive
parity /mnt/parity1/snapraid.parity

# Content files — SnapRAID's database of file checksums
# Store on multiple drives for redundancy (at least 2 locations)
content /var/snapraid/snapraid.content
content /mnt/disk1/snapraid.content
content /mnt/disk2/snapraid.content

# Data drives — order matters! Don't change after initial sync
data d1 /mnt/disk1/
data d2 /mnt/disk2/
data d3 /mnt/disk3/

# Exclude files that change frequently or aren't worth protecting
exclude *.unrecognized
exclude /tmp/
exclude /lost+found/
exclude .Trash-*/
exclude *.part
exclude aquota.group
exclude aquota.user
Create the content directory:
sudo mkdir -p /var/snapraid
Initial Sync
The first sync calculates parity for all existing data. This takes a long time (hours for terabytes of data):
sudo snapraid sync
You can monitor progress — it shows files processed and estimated time remaining. Let it finish completely.
Verify Data Integrity
After the initial sync, run a scrub to verify checksums:
# Scrub the oldest 8% of data (default)
sudo snapraid scrub

# Or scrub everything (slow, but good for initial verification)
sudo snapraid scrub -p 100
Step 4: Automate with Cron/Systemd
The Sync-Scrub Runner Script
You don't want to run snapraid sync blindly. If a drive fails and all files appear "deleted," a naive sync would update parity to reflect the empty drive — destroying your ability to recover. Use a runner script with safety checks:
#!/bin/bash
# /usr/local/bin/snapraid-runner.sh

LOG="/var/log/snapraid-runner.log"
CONF="/etc/snapraid.conf"
DELETE_THRESHOLD=50  # Abort if more than this many deletes detected

echo "=== SnapRAID Runner - $(date) ===" >> "$LOG"

# Run a diff first to see what changed
DIFF_OUTPUT=$(snapraid diff 2>&1)
echo "$DIFF_OUTPUT" >> "$LOG"

# Count deletions
DELETED=$(echo "$DIFF_OUTPUT" | grep -c "^remove")

if [ "$DELETED" -gt "$DELETE_THRESHOLD" ]; then
    echo "ERROR: $DELETED deletions detected, exceeds threshold of $DELETE_THRESHOLD. Aborting sync." >> "$LOG"
    echo "Possible drive failure. Investigate before syncing." >> "$LOG"
    # Send notification (adapt to your notification system)
    # curl -s -d "SnapRAID: $DELETED deletions detected, sync aborted" ntfy.sh/your-topic
    exit 1
fi

# Run sync
echo "Running sync..." >> "$LOG"
snapraid sync >> "$LOG" 2>&1

if [ $? -ne 0 ]; then
    echo "ERROR: Sync failed" >> "$LOG"
    exit 1
fi

# Run scrub (oldest 5% of data)
echo "Running scrub..." >> "$LOG"
snapraid scrub -p 5 -o 30 >> "$LOG" 2>&1

echo "=== Complete ===" >> "$LOG"
sudo chmod +x /usr/local/bin/snapraid-runner.sh
Schedule It
# /etc/systemd/system/snapraid-runner.timer
[Unit]
Description=Daily SnapRAID sync and scrub

[Timer]
OnCalendar=*-*-* 03:00:00
RandomizedDelaySec=1800
Persistent=true

[Install]
WantedBy=timers.target
# /etc/systemd/system/snapraid-runner.service
[Unit]
Description=SnapRAID sync and scrub
After=mnt-disk1.mount mnt-disk2.mount mnt-disk3.mount mnt-parity1.mount

[Service]
Type=oneshot
ExecStart=/usr/local/bin/snapraid-runner.sh
Nice=19
IOSchedulingClass=idle
sudo systemctl enable --now snapraid-runner.timer
The Nice=19 and IOSchedulingClass=idle ensure SnapRAID doesn't compete with your services for disk I/O.
Drive Failure Recovery
Scenario: A Data Drive Dies
This is what SnapRAID is for. Say disk2 fails:
Don't sync. Do not run
snapraid sync. This would update parity to reflect the missing data.Replace the drive. Install a new drive, format it, mount it at
/mnt/disk2.Fix the data:
sudo snapraid fix -d d2
This reconstructs all files that were on disk2 using parity data from the parity drive and data from the surviving drives.
- Verify the recovery:
sudo snapraid check -d d2
- Sync to update parity with the recovered data:
sudo snapraid sync
Scenario: The Parity Drive Dies
Replace it, mount it at /mnt/parity1, and re-sync:
sudo snapraid sync
SnapRAID recalculates all parity data. No data loss since parity isn't user data.
Scenario: Two Drives Die Simultaneously
With a single parity drive, you can survive one drive failure. If you need two-drive redundancy, add a second parity drive:
# /etc/snapraid.conf
parity /mnt/parity1/snapraid.parity
2-parity /mnt/parity2/snapraid.parity
This is equivalent to RAID6. Your parity drives must each be >= your largest data drive.
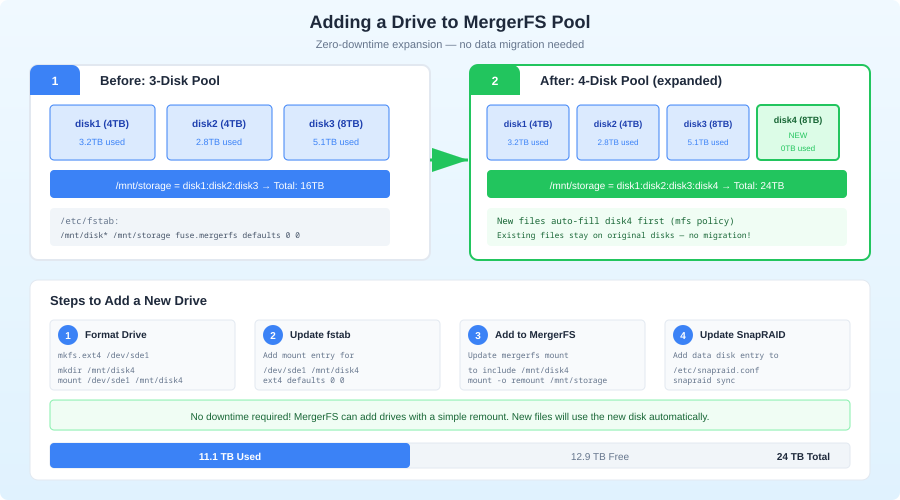
Adding More Drives
This is where MergerFS + SnapRAID shines compared to traditional RAID:
- Physically install the new drive
- Format and mount it:
sudo mkfs.ext4 -m 0 -T largefile4 /dev/sdf1
sudo mkdir /mnt/disk4
sudo mount /dev/sdf1 /mnt/disk4
Add to fstab (with UUID)
Add to MergerFS — update the fstab line:
/mnt/disk1:/mnt/disk2:/mnt/disk3:/mnt/disk4 /mnt/storage mergerfs defaults,...
Remount:
sudo umount /mnt/storage
sudo mount /mnt/storage
- Add to SnapRAID config:
data d4 /mnt/disk4/
- Sync:
sudo snapraid sync
That's it. No rebuild, no reshuffling, no downtime. The new drive is immediately available for new files and protected by parity after the next sync.
Performance Tuning
MergerFS Caching
For media streaming, the default settings are fine. For more write-heavy workloads, consider:
# In fstab mergerfs options
cache.files=auto-full   # More aggressive caching
cache.readdir=true      # Cache directory listings
cache.statfs=true       # Cache filesystem stats
SSD Cache Drive
You can add an SSD as a "hot" drive that receives all new writes, with a script that periodically moves files to the slower HDDs:
# MergerFS with SSD tier
/mnt/ssd:/mnt/disk1:/mnt/disk2:/mnt/disk3 /mnt/storage mergerfs defaults,...,category.create=ff
The ff (first found) policy writes to the first drive listed — your SSD. Then a nightly script moves aged files to the HDDs:
#!/bin/bash
# Move files older than 1 day from SSD to HDDs
find /mnt/ssd -type f -mtime +1 -exec rsync -axqHAXWES --remove-source-files {} /mnt/disk1/ \;
This gives you SSD write performance for new content with HDD bulk storage for everything else.
Monitoring
SMART Health
Monitor your drives with smartmontools:
sudo apt install smartmontools

# Quick health check
sudo smartctl -H /dev/sdb
sudo smartctl -H /dev/sdc
sudo smartctl -H /dev/sdd

# Detailed report
sudo smartctl -a /dev/sdb
Set up automated SMART monitoring:
# /etc/smartd.conf
/dev/sdb -a -o on -S on -s (S/../.././02|L/../../6/03) -m [email protected]
/dev/sdc -a -o on -S on -s (S/../.././02|L/../../6/03) -m [email protected]
/dev/sdd -a -o on -S on -s (S/../.././02|L/../../6/03) -m [email protected]
/dev/sde -a -o on -S on -s (S/../.././02|L/../../6/03) -m [email protected]
SnapRAID Status
# Quick status
snapraid status

# Shows: array health, data/parity state, files protected, scrub status
Disk Space
# Per-drive usage
df -h /mnt/disk{1,2,3}

# Merged pool usage
df -h /mnt/storage
When NOT to Use MergerFS + SnapRAID
Be honest about the limitations:
- Databases: Snapshot parity doesn't protect constantly-changing data. Use ZFS or proper backups for databases.
- VMs/containers: VM disk images change constantly. SnapRAID sync would be slow and protect poorly. Use ZFS or dedicated SSD storage.
- Real-time redundancy: If you can't tolerate any data loss window, you need real RAID or ZFS mirrors.
- Small setups: If you have 2 drives, just mirror them with mdadm. MergerFS + SnapRAID shines at 3+ data drives.
The sweet spot is media libraries, backups, document archives — data that's written once and read many times. That describes most homelab storage workloads.
Wrapping Up
MergerFS + SnapRAID is the most practical storage solution for homelabs that grow organically. You don't need matching drives. You don't need to plan capacity years in advance. You add drives as you find good deals, and the system absorbs them gracefully.
The trade-off — snapshot parity instead of real-time — is acceptable for the vast majority of homelab data. Your media library, your backups, your document archives: they're all write-once-read-many workloads where a nightly parity sync is perfectly adequate.
Set it up, automate the sync, monitor your SMART data, and you've got a flexible, expandable, recoverable storage pool that'll serve you for years.