
MQTT for IoT and Home Automation in Your Homelab
If you're running Home Assistant, ESPHome devices, or any IoT sensors in your homelab, you need MQTT. It's the protocol that ties everything together — a lightweight publish-subscribe messaging system designed for constrained devices and unreliable networks. Your temperature sensor publishes a reading, your automation system subscribes to it, and MQTT handles the delivery.
Photo by Homa Appliances on Unsplash
You could use Home Assistant's built-in integrations for everything, but MQTT gives you a decoupled architecture. Devices don't need to know about each other. They publish to topics, and anything that cares about that topic subscribes. Add a new sensor? It starts publishing. Add a new dashboard? It subscribes. No reconfiguration of existing components.
This guide sets up a production-quality MQTT broker with Eclipse Mosquitto, secures it properly, integrates it with Home Assistant, and shows practical patterns for IoT data in a homelab.
MQTT Fundamentals
If you're already familiar with MQTT, skip to the installation section. If not, here's what you need to know.
Publish-Subscribe Pattern
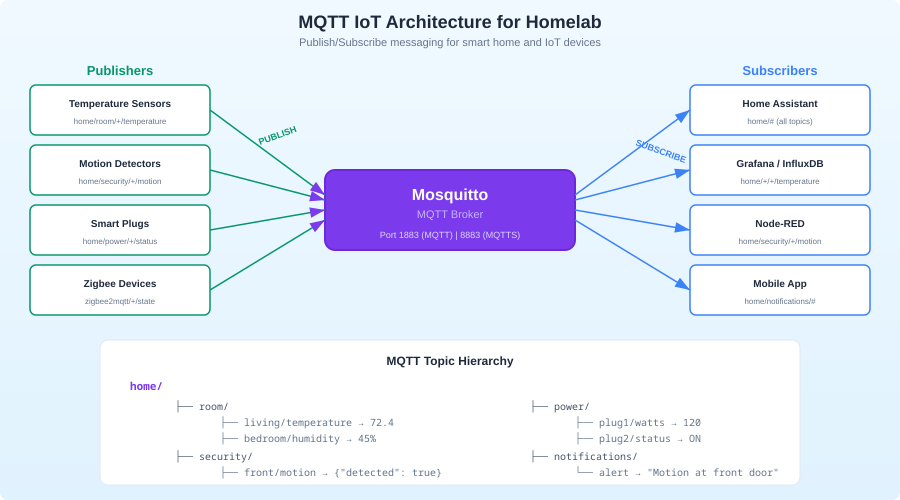
MQTT uses a broker (server) that sits between publishers and subscribers:
                    ┌──────────────┐
Temperature ───────▶│              │───────▶ Home Assistant
  Sensor            │  MQTT Broker │
                    │  (Mosquitto) │───────▶ Grafana Dashboard
Motion    ─────────▶│              │
  Sensor            └──────────────┘───────▶ Node-RED
                           ▲
                           │
                    Smart Plug ──────────
- Publishers send messages to a topic (like
home/livingroom/temperature) - Subscribers listen to topics (they can use wildcards:
home/+/temperatureorhome/#) - The broker routes messages from publishers to matching subscribers
Topics
Topics are hierarchical, separated by /:
home/livingroom/temperature
home/livingroom/humidity
home/kitchen/motion
home/garage/door/status
homelab/server1/cpu/temp
homelab/ups/battery/percent
Wildcards:
+matches one level:home/+/temperaturematcheshome/livingroom/temperatureandhome/kitchen/temperature#matches everything below:home/#matches all topics starting withhome/
Quality of Service (QoS)
MQTT has three QoS levels:
- QoS 0: Fire and forget. No acknowledgment. Fast but messages can be lost.
- QoS 1: At least once. Broker acknowledges receipt. Messages may be duplicated.
- QoS 2: Exactly once. Full handshake. Slowest but guaranteed.
For homelab IoT, QoS 1 is the sweet spot. Temperature readings are fine with occasional duplicates. You don't need the overhead of QoS 2, and QoS 0 can lose data during network hiccups.
Retained Messages
A retained message stays on the broker and is immediately delivered to new subscribers. This is important for state topics — when Home Assistant restarts, it needs to know the current state of devices without waiting for the next update.
# Publish with retain flag
mosquitto_pub -t "home/garage/door/status" -m "closed" -r
Installing Mosquitto
Eclipse Mosquitto is the standard MQTT broker. It's lightweight (runs happily on a Raspberry Pi), well-maintained, and has been battle-tested for years.
Option 1: Docker/Podman Container (Recommended)
# docker-compose.yml
services:
  mosquitto:
    image: eclipse-mosquitto:2
    container_name: mosquitto
    restart: unless-stopped
    ports:
      - "1883:1883"    # MQTT
      - "9001:9001"    # WebSocket (optional)
    volumes:
      - ./mosquitto/config:/mosquitto/config
      - ./mosquitto/data:/mosquitto/data
      - ./mosquitto/log:/mosquitto/log
Option 2: Native Installation
# Ubuntu/Debian
sudo apt install mosquitto mosquitto-clients

# Fedora
sudo dnf install mosquitto

# Arch
sudo pacman -S mosquitto
Basic Configuration
Create the Mosquitto config file:
# /etc/mosquitto/mosquitto.conf (native)
# or ./mosquitto/config/mosquitto.conf (container)

# Persistence — save messages to disk
persistence true
persistence_location /mosquitto/data/

# Logging
log_dest file /mosquitto/log/mosquitto.log
log_type all

# Listener on default MQTT port
listener 1883

# IMPORTANT: Require authentication (Mosquitto 2.0+ has no anonymous by default)
allow_anonymous false
password_file /mosquitto/config/passwords.txt
Set Up Authentication
Create a password file:
# Native installation
sudo mosquitto_passwd -c /etc/mosquitto/passwords.txt homeassistant
# Enter password when prompted

# Add more users
sudo mosquitto_passwd /etc/mosquitto/passwords.txt sensor-user
sudo mosquitto_passwd /etc/mosquitto/passwords.txt grafana-reader

# For Docker, use the container:
docker exec -it mosquitto mosquitto_passwd -c /mosquitto/config/passwords.txt homeassistant
Restart Mosquitto:
sudo systemctl restart mosquitto
# or
docker compose restart mosquitto
Test the Setup
Open two terminal windows:
# Terminal 1: Subscribe
mosquitto_sub -h localhost -u homeassistant -P yourpassword -t "test/#" -v

# Terminal 2: Publish
mosquitto_pub -h localhost -u homeassistant -P yourpassword -t "test/hello" -m "it works"
You should see test/hello it works appear in Terminal 1.
Securing MQTT with TLS
Running MQTT without encryption means passwords and sensor data fly across your network in plaintext. For a homelab on a trusted network, this might be acceptable. But if any IoT devices are on a separate VLAN (they should be), or if you're exposing MQTT externally, you need TLS.
Generate Certificates
Using Let's Encrypt (if you have a domain) or self-signed certificates:
# Self-signed CA and server certificate
# Generate CA
openssl genrsa -out ca.key 2048
openssl req -new -x509 -days 3650 -key ca.key -out ca.crt -subj "/CN=Homelab MQTT CA"

# Generate server key and certificate
openssl genrsa -out server.key 2048
openssl req -new -key server.key -out server.csr -subj "/CN=mqtt.homelab.local"
openssl x509 -req -in server.csr -CA ca.crt -CAkey ca.key -CAcreateserial -out server.crt -days 3650
Configure Mosquitto for TLS
# /etc/mosquitto/mosquitto.conf

# Unencrypted listener (local only, for devices that can't do TLS)
listener 1883 127.0.0.1
allow_anonymous false
password_file /mosquitto/config/passwords.txt

# TLS listener (for network access)
listener 8883
cafile /mosquitto/certs/ca.crt
certfile /mosquitto/certs/server.crt
keyfile /mosquitto/certs/server.key
allow_anonymous false
password_file /mosquitto/config/passwords.txt
Test TLS Connection
mosquitto_sub -h mqtt.homelab.local -p 8883 \
  --cafile ca.crt \
  -u homeassistant -P yourpassword \
  -t "test/#" -v
Want more automation guides? Get guides like this in your inbox — HomeLab Starter delivers one free deep-dive every week.
Access Control Lists (ACLs)
Different users should have different permissions. Your temperature sensor shouldn't be able to subscribe to your door lock commands:
# /mosquitto/config/acl.conf

# Home Assistant gets full access
user homeassistant
topic readwrite #

# Sensor user can only publish to sensor topics
user sensor-user
topic write home/+/temperature
topic write home/+/humidity
topic write home/+/motion

# Grafana can only read
user grafana-reader
topic read #

# ESPHome devices
user esphome
topic readwrite homeassistant/#
topic readwrite esphome/#
Add to mosquitto.conf:
acl_file /mosquitto/config/acl.conf
Home Assistant Integration
Installing the MQTT Integration
In Home Assistant, go to Settings > Devices & Services > Add Integration > MQTT.
Configure:
- Broker: Your Mosquitto hostname/IP
- Port: 1883 (or 8883 for TLS)
- Username: homeassistant
- Password: your password
MQTT Discovery
Home Assistant supports MQTT auto-discovery. Devices that follow the discovery protocol automatically appear in HA without manual configuration. ESPHome, Zigbee2MQTT, and Tasmota all support this.
The discovery prefix is homeassistant/ by default. A device publishes its configuration to:
homeassistant/sensor/livingroom_temp/config
With a payload like:
{
  "name": "Living Room Temperature",
  "state_topic": "home/livingroom/temperature",
  "unit_of_measurement": "°C",
  "device_class": "temperature",
  "unique_id": "livingroom_temp_001",
  "device": {
    "identifiers": ["esp32_livingroom"],
    "name": "Living Room Sensor",
    "manufacturer": "DIY",
    "model": "ESP32 DHT22"
  }
}
Home Assistant automatically creates a sensor entity from this configuration. When the device publishes temperature readings to home/livingroom/temperature, HA picks them up.
Manual MQTT Entities
For devices that don't support discovery, define them in configuration.yaml:
mqtt:
  sensor:
    - name: "Server Room Temperature"
      state_topic: "homelab/serverroom/temperature"
      unit_of_measurement: "°C"
      device_class: temperature

    - name: "UPS Battery"
      state_topic: "homelab/ups/battery/percent"
      unit_of_measurement: "%"
      device_class: battery

  binary_sensor:
    - name: "Garage Door"
      state_topic: "home/garage/door/status"
      payload_on: "open"
      payload_off: "closed"
      device_class: garage_door

  switch:
    - name: "Server Room Fan"
      command_topic: "homelab/serverroom/fan/set"
      state_topic: "homelab/serverroom/fan/state"
      payload_on: "ON"
      payload_off: "OFF"
ESPHome: The Best MQTT Companion
ESPHome is the easiest way to build MQTT-connected sensors. Flash an ESP32 or ESP8266 with a YAML config and it publishes sensor data over MQTT automatically.
Example: Temperature and Humidity Sensor
# esphome/livingroom-sensor.yaml
esphome:
  name: livingroom-sensor

esp32:
  board: esp32dev

wifi:
  ssid: !secret wifi_ssid
  password: !secret wifi_password

mqtt:
  broker: 192.168.1.100
  username: esphome
  password: !secret mqtt_password
  topic_prefix: home/livingroom

sensor:
  - platform: dht
    pin: GPIO4
    model: DHT22
    temperature:
      name: "Living Room Temperature"
      filters:
        - offset: -0.5  # Calibration offset
    humidity:
      name: "Living Room Humidity"
    update_interval: 60s

  - platform: wifi_signal
    name: "Living Room Sensor WiFi"
    update_interval: 300s

binary_sensor:
  - platform: gpio
    pin:
      number: GPIO5
      mode: INPUT_PULLUP
    name: "Living Room Motion"
    device_class: motion
Flash it with esphome run livingroom-sensor.yaml and it starts publishing to your Mosquitto broker immediately.
Homelab Monitoring Over MQTT
MQTT isn't just for IoT devices. You can publish server metrics to MQTT and consume them in Home Assistant or Grafana.
Publishing Server Metrics
A simple script that publishes system stats:
#!/bin/bash
# /usr/local/bin/mqtt-stats.sh

BROKER="192.168.1.100"
USER="sensor-user"
PASS="yourpassword"
PREFIX="homelab/$(hostname)"

# CPU temperature
CPU_TEMP=$(cat /sys/class/thermal/thermal_zone0/temp 2>/dev/null)
if [ -n "$CPU_TEMP" ]; then
    CPU_TEMP=$((CPU_TEMP / 1000))
    mosquitto_pub -h "$BROKER" -u "$USER" -P "$PASS" -t "$PREFIX/cpu/temp" -m "$CPU_TEMP" -r
fi

# CPU usage
CPU_USAGE=$(top -bn1 | grep "Cpu(s)" | awk '{print 100 - $8}')
mosquitto_pub -h "$BROKER" -u "$USER" -P "$PASS" -t "$PREFIX/cpu/usage" -m "$CPU_USAGE" -r

# Memory usage
MEM_USED=$(free -m | awk 'NR==2{printf "%.1f", $3*100/$2}')
mosquitto_pub -h "$BROKER" -u "$USER" -P "$PASS" -t "$PREFIX/memory/percent" -m "$MEM_USED" -r

# Disk usage
DISK_USED=$(df -h / | awk 'NR==2{print $5}' | tr -d '%')
mosquitto_pub -h "$BROKER" -u "$USER" -P "$PASS" -t "$PREFIX/disk/percent" -m "$DISK_USED" -r

# UPS battery (if apcupsd is running)
if command -v apcaccess &> /dev/null; then
    BATT=$(apcaccess | grep BCHARGE | awk '{print $3}')
    mosquitto_pub -h "$BROKER" -u "$USER" -P "$PASS" -t "$PREFIX/ups/battery" -m "$BATT" -r
fi
Run it every minute:
# /etc/systemd/system/mqtt-stats.timer
[Unit]
Description=Publish system stats to MQTT

[Timer]
OnBootSec=30
OnUnitActiveSec=60

[Install]
WantedBy=timers.target
Grafana + MQTT
Grafana can consume MQTT data through several paths:
- MQTT > InfluxDB > Grafana: Use Telegraf with the MQTT consumer plugin to write to InfluxDB. Grafana reads from InfluxDB. This is the most mature approach.
- MQTT > Prometheus > Grafana: Use mqtt2prometheus exporter to convert MQTT messages to Prometheus metrics.
- Grafana MQTT plugin: Direct MQTT connection from Grafana (community plugin, less mature).
The Telegraf approach:
# telegraf.conf
[[inputs.mqtt_consumer]]
  servers = ["tcp://192.168.1.100:1883"]
  username = "grafana-reader"
  password = "yourpassword"
  topics = [
    "homelab/#",
    "home/#"
  ]
  data_format = "value"
  data_type = "float"

[[outputs.influxdb_v2]]
  urls = ["http://localhost:8086"]
  token = "your-influxdb-token"
  organization = "homelab"
  bucket = "mqtt_data"
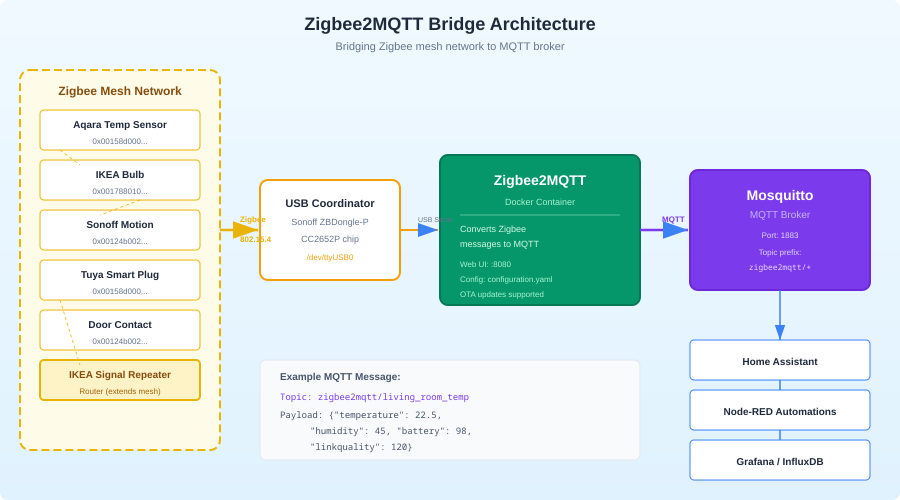
Zigbee2MQTT: Bridging Zigbee Devices
If you have Zigbee devices (Aqara sensors, IKEA bulbs, Sonoff switches), Zigbee2MQTT bridges them to your MQTT broker. Each Zigbee device gets its own MQTT topic:
zigbee2mqtt/living_room_sensor → {"temperature": 22.5, "humidity": 45, "battery": 98}
zigbee2mqtt/kitchen_motion → {"occupancy": true, "illuminance": 150}
Setup is straightforward:
# docker-compose.yml addition
  zigbee2mqtt:
    image: koenkk/zigbee2mqtt
    container_name: zigbee2mqtt
    restart: unless-stopped
    volumes:
      - ./zigbee2mqtt/data:/app/data
    ports:
      - "8081:8080"
    devices:
      - /dev/ttyUSB0:/dev/ttyACM0   # Your Zigbee coordinator
    environment:
      - TZ=America/Los_Angeles
# zigbee2mqtt/data/configuration.yaml
mqtt:
  base_topic: zigbee2mqtt
  server: mqtt://192.168.1.100:1883
  user: esphome
  password: yourpassword

serial:
  port: /dev/ttyACM0

frontend:
  port: 8080

advanced:
  homeassistant_discovery_topic: homeassistant
  homeassistant_status_topic: homeassistant/status
MQTT Topic Design Best Practices
Good topic design makes your system easier to manage as it grows:
Use a Consistent Hierarchy
# Location-based (recommended for home automation)
{area}/{room}/{device}/{measurement}
home/livingroom/sensor1/temperature
home/kitchen/motion1/occupancy

# Function-based (good for homelab infrastructure)
{system}/{host}/{subsystem}/{metric}
homelab/server1/cpu/temperature
homelab/nas/disk/usage
Conventions
- Use lowercase
- Use
/as separator (not.or-) - Don't start with
/(it creates an empty level) - Don't use spaces or special characters
- Keep it readable — someone looking at your topic tree should understand the structure
Status Topics
Use status or availability topics for device health:
home/livingroom/sensor1/status → "online" or "offline"
Configure your devices to publish offline as their MQTT Last Will and Testament (LWT). The broker automatically publishes this when the device disconnects unexpectedly:
# ESPHome LWT config
mqtt:
  birth_message:
    topic: home/livingroom/sensor1/status
    payload: online
  will_message:
    topic: home/livingroom/sensor1/status
    payload: offline
Monitoring Mosquitto
Built-in System Topics
Mosquitto publishes statistics to $SYS/ topics:
# Subscribe to all system stats
mosquitto_sub -h localhost -u admin -P pass -t '$SYS/#' -v
Key metrics:
$SYS/broker/clients/connected— currently connected clients$SYS/broker/messages/received— total messages received$SYS/broker/load/messages/received/1min— message rate$SYS/broker/uptime— broker uptime in seconds
Prometheus Exporter
For Grafana dashboards, use the Mosquitto Prometheus exporter:
# docker-compose.yml
  mqtt-exporter:
    image: sapcc/mosquitto-exporter
    container_name: mqtt-exporter
    restart: unless-stopped
    ports:
      - "9234:9234"
    environment:
      - BROKER_ENDPOINT=tcp://mosquitto:1883
      - MQTT_USER=grafana-reader
      - MQTT_PASS=yourpassword
Troubleshooting
Messages Not Arriving
# Check if broker is receiving messages
mosquitto_sub -h localhost -u admin -P pass -t '#' -v
If you see messages here but not in your subscriber, the issue is the subscriber's topic filter or ACL permissions.
Connection Refused
# Check Mosquitto is running
systemctl status mosquitto

# Check the log
tail -f /var/log/mosquitto/mosquitto.log

# Common: password file permissions
ls -la /etc/mosquitto/passwords.txt
# Should be readable by the mosquitto user
High Latency
MQTT is designed for millisecond-level latency. If you're seeing delays:
- Check QoS levels — QoS 2 adds handshake overhead
- Check network — is the broker on the same VLAN as your devices?
- Check broker load —
$SYS/broker/load/messages/received/1min
Persistent Sessions
If a subscriber disconnects and misses messages, use persistent sessions:
mosquitto_sub -h localhost -u user -P pass -t "home/#" -i "my-client-id" -c
The -i flag sets a client ID and -c disables clean session. The broker queues messages while the client is offline and delivers them when it reconnects. This is essential for automation systems that restart occasionally.
Wrapping Up
MQTT is the glue layer for a connected homelab. Once you have Mosquitto running, every new device or service you add just publishes to or subscribes from topics. No point-to-point integrations, no API compatibility concerns, no tight coupling.
Start with Mosquitto and a few ESPHome sensors. Get comfortable with the topic hierarchy and publish-subscribe pattern. Then connect Home Assistant, add Zigbee2MQTT for your Zigbee devices, and start publishing server metrics. Before long, your entire homelab is observable and automatable through a single message bus.
The protocol is simple, the tooling is mature, and the pattern scales from 5 devices to 500 without changing architecture. For a homelab in 2026, MQTT is infrastructure you'll use for everything.